Yesterday I chose to buy a couple more four foot lights and finish the install.
I ended up with 10ea four foot and 1ea eight foot lights.
I think it will be enough.
Sunday, August 26, 2012
Sunday, August 19, 2012
Garage Lighting
Last weekend I purchased some T5HO lights from Home Depot but only had time to remove the existing 32 watt T8 lights and replace them along with putting one 8 foot long fixture above my work bench. This weekend after seeing how the existing light circuit was wired and the current loading on it I did not feel comfortable adding all the other lights I had bought. I decided to wire in another 15 amp circuit for the additional lights, an added benefit to this would be that I could split how many lights were on at one time.
The pictures I have taken are with just over half the lights installed, I still have three more four foot lights and one eight foot light to install in the other two bays. Looking back in my blog you can see many of the pictures I took were with the lights on and the door open the difference with the new lights is quite drastic. Taking a picture of them does them no justice, the auto exposure dims the camera and disabling it only produces a washed out picture.
The T5HO bulbs are 5000 Lumen per bulb compared with the T8 lights I removed which are 2800 Lumen per bulb.
The pictures I have taken are with just over half the lights installed, I still have three more four foot lights and one eight foot light to install in the other two bays. Looking back in my blog you can see many of the pictures I took were with the lights on and the door open the difference with the new lights is quite drastic. Taking a picture of them does them no justice, the auto exposure dims the camera and disabling it only produces a washed out picture.
The T5HO bulbs are 5000 Lumen per bulb compared with the T8 lights I removed which are 2800 Lumen per bulb.
With the camera directed more towards the car, it gives a better indication of how bright the lighting is.
Monday, July 30, 2012
GRAND-AM at Indy
In February I was watching the 24 hours of Daytona when they advertized that they were going to race in Indy this year and as a promotion to that they were selling tickets for $24.00. I have always wanted to go to a big sports car race and at that price it was a no brainer. What I didn't know till the day before the race was they were good for the entire day and you basically can go anywhere you want, pits, seating etc.
I went with a buddy from work and we arrived at the speedway just after 1pm which was the start time for the Continental Tire Sports Car Challenge. We pulled into a parking lot directly across from the main straight and the lady collecting money asked me to park my car right next to her. I never got an explanation but I wasn't going to complain about the great parking spot.
The Continental Tire Sports Car Challenge was a good race only hampered by a 25 minute or so red flag for standing water about 40 minutes before the end of the 2.5 hour race.
The GRAND-AM race started under a green/yellow flag due to the rain picking up again. The day was perfect the temperature was great and it hadn't rained here in months. During the GRAND-AM race it flared up two or three times with very heavy rain then the sun would come out bright and dry the main track in a matter of a few minutes leaving the road course with standing water.
We chose seats at the end of the pit out which was the start of the braking area for turn one. This enforced for me why I very seldom go to IMS to watch a race. I am sure there are good seats there and much better than we had but every time I have been there I have had nothing but poles, fences, stands, screens and banners blocking the view. I do plan to go again next year and try to get a spot on the infield area, from watching the race later on TV it looks to be much more open.
Here is a picture of where we were sitting we moved once after we realized the screen hanging from the box seats above us was blocking half the track in the distance, you can see it in this picture on the upper left hand area. The red square I put on the picture is the area I took a lot of my pictures from, Its hard to judge distance but I would guess it to be a good 300 yards from where we were sitting.
Here is a shot from that area of the DP Corvettes, they were absolutely beautiful and sounded incredible.
Here is the ZL1 pace car that started the race.
Here is the ZL1 pace car that ended the race.
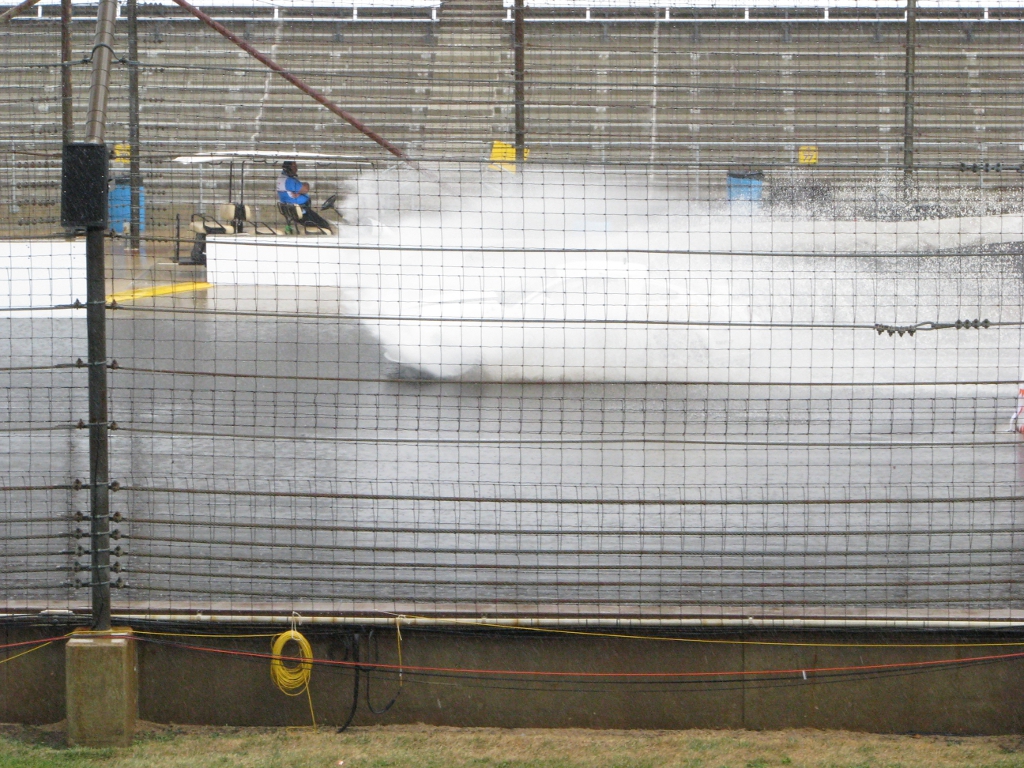
Unfortunately the team I tend to root for the SDR Motorsports #90 wrecked between the third and fourth turns on the first lap. Antonio Garcia was being far too aggressive that early in the race with the wet conditions. There was a ton of action during the race with the track being soaked on three separate occasions, the cars were in and out numerous times to switch between slicks and rain tires. At one point the pit out area directly across from us was a lake as you can see in the picture below.
This brought cheers from the fans as each car exiting completely soaked the track workers who you cannot even see in the picture. Eventually the pit out flagman moved to the other side of the retaining wall between the track and the pit out lane.
I went with a buddy from work and we arrived at the speedway just after 1pm which was the start time for the Continental Tire Sports Car Challenge. We pulled into a parking lot directly across from the main straight and the lady collecting money asked me to park my car right next to her. I never got an explanation but I wasn't going to complain about the great parking spot.
The Continental Tire Sports Car Challenge was a good race only hampered by a 25 minute or so red flag for standing water about 40 minutes before the end of the 2.5 hour race.
The GRAND-AM race started under a green/yellow flag due to the rain picking up again. The day was perfect the temperature was great and it hadn't rained here in months. During the GRAND-AM race it flared up two or three times with very heavy rain then the sun would come out bright and dry the main track in a matter of a few minutes leaving the road course with standing water.
We chose seats at the end of the pit out which was the start of the braking area for turn one. This enforced for me why I very seldom go to IMS to watch a race. I am sure there are good seats there and much better than we had but every time I have been there I have had nothing but poles, fences, stands, screens and banners blocking the view. I do plan to go again next year and try to get a spot on the infield area, from watching the race later on TV it looks to be much more open.
Here is a picture of where we were sitting we moved once after we realized the screen hanging from the box seats above us was blocking half the track in the distance, you can see it in this picture on the upper left hand area. The red square I put on the picture is the area I took a lot of my pictures from, Its hard to judge distance but I would guess it to be a good 300 yards from where we were sitting.
Here is a shot from that area of the DP Corvettes, they were absolutely beautiful and sounded incredible.
Here is the ZL1 pace car that started the race.
Here is the ZL1 pace car that ended the race.
Unfortunately the team I tend to root for the SDR Motorsports #90 wrecked between the third and fourth turns on the first lap. Antonio Garcia was being far too aggressive that early in the race with the wet conditions. There was a ton of action during the race with the track being soaked on three separate occasions, the cars were in and out numerous times to switch between slicks and rain tires. At one point the pit out area directly across from us was a lake as you can see in the picture below.
This brought cheers from the fans as each car exiting completely soaked the track workers who you cannot even see in the picture. Eventually the pit out flagman moved to the other side of the retaining wall between the track and the pit out lane.
The last hour of the race brought a lot of controversy from the #02 car fielded by CGR and driven by Scott Dixon and Juan "Im only famous for running into a jet dryer" Montoya. The #01 car last years championship winner fielded by CGR is again in the running but was in third place in the standings. Coincidentally Montoya managed to take out the #09 Action Express Racing corvette of Joao Barbosa and the #08 Starworks Motorsports entry driven by Ryan Dalziel. Both cars were ahead of CGR in the standings and both were contenders to win the race. It seems though that the need to have CGR in the series outweighs any repercussions for his driving.
Here is a shot of Montoya just moments before spinning out the 09.
I am looking forward to going again next year somewhere in the infield, maybe I'll join a corvette club and do the corral thing.
Sunday, July 1, 2012
Fender Bender
Tania had a small fender bender at work this week. She hit a concrete pillar with the front passenger fender while she was backing out of a parking spot at work. Fortunately she wasn't hurt, just mad.
There is a small dent in the fender radius and some of the scrapes went to the bare metal. I worked on it some today and was able to get the majority of the scratches out of it with some 600 grit working up to 2000 grit pad. Because of where the dent is I think it would end up worse than it looks now if I tried to take it out. I haven't decided if I am going to leave it as is or get some paint and try and fix it completely.
I also finished up a project I started earlier in the week. I bought a magnification light at a garage sale a few weeks ago for 2.00. The lamp did not work and the pivot pin out of the cast metal base was broken. The lamp was a new bulb and some contact cleaner in the switch. For the base I welded some strap around the cast housing along with a 5/8" steel rod as a new pin. It pivots on a piece of polished steel that I found at the junk yard years ago, I think it was designed to be a union for fluid lines. I cleaned it up and knocked out some of the dents that were in it, tightened up all the loose hardware and polished the lens. I'm happy with how it turned out and will probably end up using it quite a bit.
I spent the rest of the afternoon removing all the wheels from the corvette, cleaning all the wheel barrels and putting a good coat of wax on them. Its amazing how much tar and rocks were stuck to the front ones. In the back I can reach through the spokes and around the brake rotor to easily wipe them down when I wash the car. The front wheels are one inch in diameter smaller and the brakes are three inches in diameter bigger which makes it next to impossible to get my hand past. I am hoping the wax will keep most of the tar from sticking or it will come off easily with water. No one but me probably notices it.....
There is a small dent in the fender radius and some of the scrapes went to the bare metal. I worked on it some today and was able to get the majority of the scratches out of it with some 600 grit working up to 2000 grit pad. Because of where the dent is I think it would end up worse than it looks now if I tried to take it out. I haven't decided if I am going to leave it as is or get some paint and try and fix it completely.
I also finished up a project I started earlier in the week. I bought a magnification light at a garage sale a few weeks ago for 2.00. The lamp did not work and the pivot pin out of the cast metal base was broken. The lamp was a new bulb and some contact cleaner in the switch. For the base I welded some strap around the cast housing along with a 5/8" steel rod as a new pin. It pivots on a piece of polished steel that I found at the junk yard years ago, I think it was designed to be a union for fluid lines. I cleaned it up and knocked out some of the dents that were in it, tightened up all the loose hardware and polished the lens. I'm happy with how it turned out and will probably end up using it quite a bit.
I spent the rest of the afternoon removing all the wheels from the corvette, cleaning all the wheel barrels and putting a good coat of wax on them. Its amazing how much tar and rocks were stuck to the front ones. In the back I can reach through the spokes and around the brake rotor to easily wipe them down when I wash the car. The front wheels are one inch in diameter smaller and the brakes are three inches in diameter bigger which makes it next to impossible to get my hand past. I am hoping the wax will keep most of the tar from sticking or it will come off easily with water. No one but me probably notices it.....
Sunday, June 17, 2012
Garage Stereo
Two weeks ago I was driving back from Lowes when I saw a sign for a garage sale, it was in a division just off of ours that is much older. Usually that will mean people have lived there longer and had more time to collect stuff. The house had stuff all over the lawn and the driveway along with a slightly pissed off woman who's husband was not around to "help sell his junk". This enabled me to get three oak kitchen lower cabinets for $20.00 which I plan to use in the laundry room to make an area to fold clothes. A Hon 5 drawer vertical file cabinet for $20.00 and a Kenwood reciever, two Aiwa speakers, a subwoofer and a magnification light for another $20.00.
The garage stereo sounds great now.
I also purchased a ceiling fan for the living room. I had been looking at different ones online but was concerned that the standard 54" fan would not look good in a room that big. Lowes had a 60" Hunter on sale and I was so impressed with how it was built and its looks I went back and bought another for our bedroom.
This weekend I spend working on the Corvette again. The passenger door has never fit properly and I had never taken the time to look at it. By loosening the hinges I was able to rotate the bottom of the door inward and taking the door panel off let me adjust the striker. Now instead of it sticking out 3/16" along the aft edge from the center down, its nice and flush with the rear quarter. It also fixed a clearance problem the car always has had with the passenger front fender.
I also decided to clay-bar the car, the paint on it had become very rough to the touch and after hitting it with a clay-bar I understood why. The pictures below are the clay-bar before use and after going over a one square foot area. Sorry for how blurry they are it was difficult to take them with my left hand.
Now the paint on the car feels like cold glass, its amazing what this clay-bar does and how easy it is. Speaking of glass I did the back window and the windshield with the same results. The clay-bar works great on glass and gets it amazingly clean. We also used it on one of the house windows and it removed all the water spots as easy as if I had wiped them with a paper towel.
The garage stereo sounds great now.
I also purchased a ceiling fan for the living room. I had been looking at different ones online but was concerned that the standard 54" fan would not look good in a room that big. Lowes had a 60" Hunter on sale and I was so impressed with how it was built and its looks I went back and bought another for our bedroom.
This weekend I spend working on the Corvette again. The passenger door has never fit properly and I had never taken the time to look at it. By loosening the hinges I was able to rotate the bottom of the door inward and taking the door panel off let me adjust the striker. Now instead of it sticking out 3/16" along the aft edge from the center down, its nice and flush with the rear quarter. It also fixed a clearance problem the car always has had with the passenger front fender.
I also decided to clay-bar the car, the paint on it had become very rough to the touch and after hitting it with a clay-bar I understood why. The pictures below are the clay-bar before use and after going over a one square foot area. Sorry for how blurry they are it was difficult to take them with my left hand.
Now the paint on the car feels like cold glass, its amazing what this clay-bar does and how easy it is. Speaking of glass I did the back window and the windshield with the same results. The clay-bar works great on glass and gets it amazingly clean. We also used it on one of the house windows and it removed all the water spots as easy as if I had wiped them with a paper towel.
Sunday, June 10, 2012
Radiator Support
This weekend I had to replace the radiator support in the Corvette. GM lists this part as a "skid plate" but makes it to self destruct upon contact with anything. It does not appear to be a bad design but more so that it is manufactured poorly. The design of it would appear that it is to protect the bottom nose of the car from parking barriers etc. it also serves as the lower radiator support.
I took the Corvette into the dealership two weeks ago to have some things looked at, one being a popping sound from the rear suspension. The dealership found the lower radiator support broken, told me it was abused and would not be covered by warranty and that they would not be able to find the popping sound until it was fixed, which they would do for the sum of $380.00. I bought one from a GM dealer online for $130.00 and replaced it in a few hours.
My frustration with the whole thing is how poorly the support is welded. It obviously has some damage from rubbing against a parking barrier, but it would not have failed had the welds been adequate. Looking at them its apparent that there was no penetration on the welds and they have excessive porosity.
This is a picture of the end of the support upside down and the "fang" that sticks down below the nose of the car. I took it to show the amount of "abuse" the "skid plate" had sustained.
These are pictures of the poor welds that failed on the part.
Since there is no other damage than the welds pulling apart I plan to have it re-welded and use it as a backup for when the new one I installed does the same thing.
I took the Corvette into the dealership two weeks ago to have some things looked at, one being a popping sound from the rear suspension. The dealership found the lower radiator support broken, told me it was abused and would not be covered by warranty and that they would not be able to find the popping sound until it was fixed, which they would do for the sum of $380.00. I bought one from a GM dealer online for $130.00 and replaced it in a few hours.
My frustration with the whole thing is how poorly the support is welded. It obviously has some damage from rubbing against a parking barrier, but it would not have failed had the welds been adequate. Looking at them its apparent that there was no penetration on the welds and they have excessive porosity.
This is a picture of the end of the support upside down and the "fang" that sticks down below the nose of the car. I took it to show the amount of "abuse" the "skid plate" had sustained.
These are pictures of the poor welds that failed on the part.
Since there is no other damage than the welds pulling apart I plan to have it re-welded and use it as a backup for when the new one I installed does the same thing.
Thursday, June 7, 2012
Project Garage: Week 8
This weekend I got a lot of stuff done but not much of what I had planned to do.
I finished installing the pegboard and lights in the cabinets. The one to the left is all house items, the one in the center is mostly yard equipment and the one on the right is all automotive. I still have a lot of items to load into it,
I needed to finish the pinstripe in the double bay and behind the work
benches. While I had them pulled out from the wall I decided to mount
some T8 lights on them and change all the outlets around them from twist
locks to standard plugs. This took the better part of the day because
the benches had small boxes and were all wired with 10 gauge wire.
I still haven't made a decision on pneumatic lines and will probably wait a bit longer, I think I will work on the lighting next. My last garage has 8ea 4ft 4 bulb fixtures. I think for this one I am going to use the 4ft end to end fixtures. Right now it has 2ea 4ft 2 bulb builder fixtures and is very dimly lit.
Sunday, May 13, 2012
Project Garage: Week 6
I managed to get quite a bit done this weekend. Friday I stopped at Harbor Freight to get a automatic compressor drain kit, the kit they sell is one of the few mechanical kits I have seen and is substantially cheaper than an electric one. Unfortunately because of its design and my compressor I was only able to use one valve from the kit. I was able to get everything else I needed from Lowes and for less than $40.00 it seems to work quite well. It connects to the line between the pressure valve and the pressure switch, I was able to find a compression T fitting and run a 1/4 copper line down the back of the compressor to the auto drain valve.
When the compressor reaches its filled pressure the pressure valve opens sending air to the pressure switch shutting off the motor. Tapping into this line also sends air to the auto drain valve opening it for a second each time the compressor shuts off, which should drain condensation from the tank.
While I was looking for my tubing cutter I came across some old suspension parts I had. I found some upper a-arm bump stops which I decided to try as vibration isolators for the compressor. With them installed the noise during operation is much less.
I also picked up a Gladiator GearTrack section to hang some of the more commonly used items in the garage. I was never a big fan of hanging a bunch of junk on the walls but for these items and having them between the two garage doors, easy to get at it made sense.
I finally started installing the pegboard I cut down for the Lista cabinets. When I first got them they had pegboard installed in this area but the owner had let them sit outside for a couple of weeks and the pegboard got wet and warped. I would have liked to install metal but the cost of it was prohibitive. The old pegboard was bolted through the shelf cutouts which left the bolt threads protruding through nuts. For this I used existing holes in the rails and #10 screws
I still need to run airlines from the compressor, I just have not yet decided how I want to do it.
When the compressor reaches its filled pressure the pressure valve opens sending air to the pressure switch shutting off the motor. Tapping into this line also sends air to the auto drain valve opening it for a second each time the compressor shuts off, which should drain condensation from the tank.
While I was looking for my tubing cutter I came across some old suspension parts I had. I found some upper a-arm bump stops which I decided to try as vibration isolators for the compressor. With them installed the noise during operation is much less.
I also picked up a Gladiator GearTrack section to hang some of the more commonly used items in the garage. I was never a big fan of hanging a bunch of junk on the walls but for these items and having them between the two garage doors, easy to get at it made sense.
I finally started installing the pegboard I cut down for the Lista cabinets. When I first got them they had pegboard installed in this area but the owner had let them sit outside for a couple of weeks and the pegboard got wet and warped. I would have liked to install metal but the cost of it was prohibitive. The old pegboard was bolted through the shelf cutouts which left the bolt threads protruding through nuts. For this I used existing holes in the rails and #10 screws
I still need to run airlines from the compressor, I just have not yet decided how I want to do it.
Sunday, May 6, 2012
Project Garage: Week 4
Last weekend it was cold (45³-50³) and I wasted most of Saturday looking for 1/4" pegboard. I would have thought that would be fairly common but apparently it isn't. This weekend it was much warmer and I was able to get the 240 run to my compressor done.
Running 4/10 to a finished, insulated wall fuse box wasn't much fun. I had Matty help me pull it though after I got a feed through installed on the top of the box. I didn't need 10 gauge wire, the compressor is only 14 amps but I have it if I ever upgrade to a real compressor.
The drop was 12 feet away in the same insulated wall.
I found a cheap safety disconnect and left enough flex to be able to move the compressor out for maintenance.
I didn't realize how much I used it until I didn't have it to use. Now I need to decide if I am going to run PEX-AL-PEX or black pipe. I don't currently have plans for a huge run probably just a 35 foot single run to the work benches on the other side of the garage.
Running 4/10 to a finished, insulated wall fuse box wasn't much fun. I had Matty help me pull it though after I got a feed through installed on the top of the box. I didn't need 10 gauge wire, the compressor is only 14 amps but I have it if I ever upgrade to a real compressor.
The drop was 12 feet away in the same insulated wall.
I found a cheap safety disconnect and left enough flex to be able to move the compressor out for maintenance.
I didn't realize how much I used it until I didn't have it to use. Now I need to decide if I am going to run PEX-AL-PEX or black pipe. I don't currently have plans for a huge run probably just a 35 foot single run to the work benches on the other side of the garage.
Friday, May 4, 2012
Indiana Plate
After an oddesy which began in Feburary and included two trips to the BMV, three phone calls, and three different registrations, I finally recieved a license plate for the Corvette. The morality department of the Indiana BMV prevented me from renewing my existing plate, so I chose the new one with an old nickname.
Subscribe to:
Posts (Atom)