My ACC Carpet from stockinteriors came in Wednesday, I purchased their base carpet with a mass back upgrade. I think the shorter nap carpet will be easier to keep clean than the plush.
Saturday I finished the peel & stick in the footwells, and put in the new carpet. The installation was painless, the molded backing made placing the carpet in the correct spot very easy.
The only complaint I had over the carpet was the amount of oil or oil residue that came off of the mass backing.
A few months ago I found a tool at Lowes that was very similar to a cutter Makita sold years ago only at 5x the price. It was a Skill Powercutter and for projects like this it works awesome, they can be bought for under 30 dollars and cut through carpet like butter. They are also great for cutting those annoying blister packages.
Today I got the items I needed for the next part of my project from a forum member. Some loaded doors with power windows, locks and mirrors off a 97, along with some of the seat belts and trim.
Next weekend I plan to go through the harness for the doors and start moving everything into the passenger door.
Sunday, September 12, 2010
Sunday, August 29, 2010
Truck Seats Pt 3
I had some surgery done to my left foot so was unable to work on this the last two weeks.
I was able to finish up the fabrication of the seat brackets just before my surgery, I put a couple of coats of POR15 on it and it has sat for the last two weeks.
Last weekend I did some reading on sound deadening and came across some threads where people had used "Peel N Seal" as a cheap alternative to the name brand sound deadeners. Its designed to be used for roof flashing. The only negative posts I found on this product was some people complained about it not being sticky enough. I had no issues at all getting it to stick, you actually better get it in the right spot the first time.
Because my foot is still very sore, I only covered what was necessary to get the brackets I made installed back in the truck. I will finish up the foot well areas next weekend along with the lower door skins.
Coverage of this amount took just under two rolls at 16.95 each, I should be able to finish the front and doors with another two rolls.
Friday I got some carpet samples from stockinteriors and hopefully the carpet I ordered will be here by next weekend.
Here is a shot of it with the seats installed and the jump seat with the six inch section taken out.
I still have not decided what I am going to do with the seat belts as far as their color, the belts coming out of the seats are from the jump seats in an extended cab. With a small amount of modification to their attachment plate I was able to bolt them up to the factory location inside the seat bottom.
Tania and I took it for a drive just a few hours ago, it has a Gibbons style catback with a 40 series flowmaster exiting just in front of the passenger side rear tire. This type of system is very loud and tends to drone in the cab. It was immediately noticeable how much quieter the truck was. This was with the front not being done and the carpet not installed, I am looking forward to how much more it will help with the rest of it being complete.
I was able to finish up the fabrication of the seat brackets just before my surgery, I put a couple of coats of POR15 on it and it has sat for the last two weeks.
Last weekend I did some reading on sound deadening and came across some threads where people had used "Peel N Seal" as a cheap alternative to the name brand sound deadeners. Its designed to be used for roof flashing. The only negative posts I found on this product was some people complained about it not being sticky enough. I had no issues at all getting it to stick, you actually better get it in the right spot the first time.
Because my foot is still very sore, I only covered what was necessary to get the brackets I made installed back in the truck. I will finish up the foot well areas next weekend along with the lower door skins.
Coverage of this amount took just under two rolls at 16.95 each, I should be able to finish the front and doors with another two rolls.
Friday I got some carpet samples from stockinteriors and hopefully the carpet I ordered will be here by next weekend.
Here is a shot of it with the seats installed and the jump seat with the six inch section taken out.
I still have not decided what I am going to do with the seat belts as far as their color, the belts coming out of the seats are from the jump seats in an extended cab. With a small amount of modification to their attachment plate I was able to bolt them up to the factory location inside the seat bottom.
Tania and I took it for a drive just a few hours ago, it has a Gibbons style catback with a 40 series flowmaster exiting just in front of the passenger side rear tire. This type of system is very loud and tends to drone in the cab. It was immediately noticeable how much quieter the truck was. This was with the front not being done and the carpet not installed, I am looking forward to how much more it will help with the rest of it being complete.
Sunday, July 18, 2010
Truck Seats Pt 2
I took some days off last week and my Dad / Stepmom came out for the week. I have not seen my Dad in seven years and spending the week with him was awesome. We did a few things in and around Tucson and spent the rest of the time around the house. He helped me change the hinge pins and bushings on my truck doors as well as the detent roller on the drivers door.
Right after he left I pulled the seats and floormat out of the truck and started measuring for the adapters I was going to make for the new seats. While laying on the floor in the truck I noticed quite a few spots that had small blisters in the paint. Digging into one I found surface rust from the factory spot welds, the welds burned off the galvanizing allowing the metal to rust, so I decided to sand down the floor and clean up the spots before they actually got bad.
The drivers door sill was the worst, some of it was due to snow melting from my shoes and running into the sill under a wire guiide. It was all surface rust but took a couple hours to clean up because of all the nooks.
The rest of the floor took a couple hours to take out the bad spots and rough up what was left.
After I wiped it down with some grease remover, Tania helped me paint it with POR15.
I had a pint that I had bought 15 years ago and never used because it was gloss. I emailed the company that makes it and they said it should be fine because it had never been opened. This paint is perfect for this type of thing and as you can see even brushed on it flows very smooth with no brush strokes visible. In Indiana this would have taken close to two days to dry due to the humidity, here I could sit back on the floor in just over an hour. After it had dried I also changed both door seals, now the doors feel like they did when the truck was brand new.
I had not planned on doing this to the floor so I ran out of time last weekend and had no choice but to toss in the original bench seat so I could drive the truck to work.
Today I was able to fab up the brackets for the drivers side seat. I did not want to drill any holes in the floor pan to mount them and they were wider than the buckets that were in the truck. I was able to use the original mount holes in the lower bracket and tie the upper bracket into the seatbelt mount. This will work well for running brackets over the center hump for the jump seat. When its all done all three seats will be mounted to one bracket.
The seat fits well for someone my size to move it any further back I will need to do something with the grab handle on the back of the seat. I also purchased new armrests for the door panels to replace the originals which were shot. I have not decided what I am going to do with the door panels yet. I will most likely change some of the interior pieces to grey to tie the seats in. I am still deciding which pieces and how much. I am ordering some dark grey carpet and will put it in after I am finished with the seat adapters.
Right after he left I pulled the seats and floormat out of the truck and started measuring for the adapters I was going to make for the new seats. While laying on the floor in the truck I noticed quite a few spots that had small blisters in the paint. Digging into one I found surface rust from the factory spot welds, the welds burned off the galvanizing allowing the metal to rust, so I decided to sand down the floor and clean up the spots before they actually got bad.
The drivers door sill was the worst, some of it was due to snow melting from my shoes and running into the sill under a wire guiide. It was all surface rust but took a couple hours to clean up because of all the nooks.
The rest of the floor took a couple hours to take out the bad spots and rough up what was left.
After I wiped it down with some grease remover, Tania helped me paint it with POR15.
I had a pint that I had bought 15 years ago and never used because it was gloss. I emailed the company that makes it and they said it should be fine because it had never been opened. This paint is perfect for this type of thing and as you can see even brushed on it flows very smooth with no brush strokes visible. In Indiana this would have taken close to two days to dry due to the humidity, here I could sit back on the floor in just over an hour. After it had dried I also changed both door seals, now the doors feel like they did when the truck was brand new.
I had not planned on doing this to the floor so I ran out of time last weekend and had no choice but to toss in the original bench seat so I could drive the truck to work.
Today I was able to fab up the brackets for the drivers side seat. I did not want to drill any holes in the floor pan to mount them and they were wider than the buckets that were in the truck. I was able to use the original mount holes in the lower bracket and tie the upper bracket into the seatbelt mount. This will work well for running brackets over the center hump for the jump seat. When its all done all three seats will be mounted to one bracket.
The seat fits well for someone my size to move it any further back I will need to do something with the grab handle on the back of the seat. I also purchased new armrests for the door panels to replace the originals which were shot. I have not decided what I am going to do with the door panels yet. I will most likely change some of the interior pieces to grey to tie the seats in. I am still deciding which pieces and how much. I am ordering some dark grey carpet and will put it in after I am finished with the seat adapters.
Saturday, June 12, 2010
Headliner
In my last post I had pictures of the new seats I had bought for my truck. The interior in my truck right now is shades of blue so I have decided to tie the grey of the new seats into it. There are many ways to do this that I will post on in the coming weeks, the first of which is going to be the headliner.
The headliner in the truck was coming loose from the cardboard base and starting to sag in numerous areas. The original headliner was white with blue sun visors and my plans to tie in the dark grey seats were to cover the headliner and sun visors with a lighter grey felt.
Last weekend Tania and I went to a fabric store and found some felt of suitable thickness for $3.99 a yard, cheap enough to buy plenty extra for any mistakes.
After pulling it out of the truck the vinyl pretty much fell off of it, leaving a thin layer of deteriorating foam which was relatively easy to remove from the cardboard just time consuming. This sort of work is much like painting, the more time you spend and the better job you do in prep the better the end result. Removing the foam and cleaning up the surface took me about an hour to do.
I wasn't able to get a good "before" shot because of the vinyl falling off but here is a shot of what the original perforated vinyl covering looked like.
Here is a shot of the finished headliner, it took a bit longer than I thought it would and I made a few errors with it. I pressed out the felt on the floor after gluing it down with 3M contact adhesive this de-arched the headliner a bit and I didn't realize it until it was too late.
Overall though it came out very nice, I was able to dye the trim around the dome light and found some grey trim retainers at the local NAPA. The biggest cost was the 3M contact adhesive at $15.00 a can.
Tomorrow I am going to work on the sun visors, they will be a bit more challenging but I think I have a good plan for how to make them work.
The headliner in the truck was coming loose from the cardboard base and starting to sag in numerous areas. The original headliner was white with blue sun visors and my plans to tie in the dark grey seats were to cover the headliner and sun visors with a lighter grey felt.
Last weekend Tania and I went to a fabric store and found some felt of suitable thickness for $3.99 a yard, cheap enough to buy plenty extra for any mistakes.
After pulling it out of the truck the vinyl pretty much fell off of it, leaving a thin layer of deteriorating foam which was relatively easy to remove from the cardboard just time consuming. This sort of work is much like painting, the more time you spend and the better job you do in prep the better the end result. Removing the foam and cleaning up the surface took me about an hour to do.
I wasn't able to get a good "before" shot because of the vinyl falling off but here is a shot of what the original perforated vinyl covering looked like.
Here is a shot of the finished headliner, it took a bit longer than I thought it would and I made a few errors with it. I pressed out the felt on the floor after gluing it down with 3M contact adhesive this de-arched the headliner a bit and I didn't realize it until it was too late.
Overall though it came out very nice, I was able to dye the trim around the dome light and found some grey trim retainers at the local NAPA. The biggest cost was the 3M contact adhesive at $15.00 a can.
Tomorrow I am going to work on the sun visors, they will be a bit more challenging but I think I have a good plan for how to make them work.
Thursday, June 3, 2010
Truck Seats
A few weeks before we moved from Indy, I found some seats for sale on Craigslist for my pickup. I had been looking for quite a while and then gave up for a few weeks. One night I got home from work and boom the first listing that came up was for some blue seats out of a 94 Z71 in "new condition". I was skeptical about 16 year old pickup seats being in new condition but was pleasantly surprised when they did actually look new.
125.00 later I had them in the back of the truck with all sorts of plans for my interior going through my head. Because 88-94 trucks basically use the same seat they were more or less a bolt in for the truck and a huge improvement over my wore out bench seat. It was just recently that I found out the seats I had bought were very undesirable because the covering on them is actually glued to the foam. This process makes the pleating in the seats look very nice for a long time and also prevents them from ever being recovered. The other minus to them is that it made my truck a two seater.
Today I was driving home from work and part of my drive home is past little garage sale setups along the side of the road. Most of it is normally fruit, leather saddles and harnesses or junk from Mexico. Today a jump seat caught my eye. I had been looking for one to add a third seat back to my truck but they seem to be very desireable and regularly sell for 175-225 dollars on Ebay.
Catching it out of the corner of my eye I made a U-turn and went back to see if it was in fact a jump seat.
When I got out of the truck I noticed a matching grey leather seat sitting a ways off from the jump seat. I asked the guy standing there how much for the jump seat and he told me it was part of a set. I though well if I can get it cheap enough I can just dump the oddball bucket seat. I also thought I should be able to get a good deal on this who would want just one bucket seat. I finally got out of the guy he wanted 300.00 for the set, I told him it was too much for one bucket and a jump seat and he said "no Senior the other bucket is in the back of my truck". He went on to explain that he had taken them out of his 2010 Tahoe because he was putting racks or something in the back. Thats when I realized these were the second row seats not the front. This started to make more sense to me because most front row seats wont fold down completely flat and they normally have the shoulder belts built into the seats making them a pain to put in older vehicles.
I took 200.00 out of my pocket, dangled it in front of his face and he said OK.
Because they are second row seats they have quick release tracks on them. I think I should be able to make rails for them fairly easy. The price was definately right its just going to be a matter of the time involved in making the rails. The fact that they are basically brand new along with the addition of the jump seat will make the effort in getting them installed in the truck more than worth it.
125.00 later I had them in the back of the truck with all sorts of plans for my interior going through my head. Because 88-94 trucks basically use the same seat they were more or less a bolt in for the truck and a huge improvement over my wore out bench seat. It was just recently that I found out the seats I had bought were very undesirable because the covering on them is actually glued to the foam. This process makes the pleating in the seats look very nice for a long time and also prevents them from ever being recovered. The other minus to them is that it made my truck a two seater.
Today I was driving home from work and part of my drive home is past little garage sale setups along the side of the road. Most of it is normally fruit, leather saddles and harnesses or junk from Mexico. Today a jump seat caught my eye. I had been looking for one to add a third seat back to my truck but they seem to be very desireable and regularly sell for 175-225 dollars on Ebay.
Catching it out of the corner of my eye I made a U-turn and went back to see if it was in fact a jump seat.
When I got out of the truck I noticed a matching grey leather seat sitting a ways off from the jump seat. I asked the guy standing there how much for the jump seat and he told me it was part of a set. I though well if I can get it cheap enough I can just dump the oddball bucket seat. I also thought I should be able to get a good deal on this who would want just one bucket seat. I finally got out of the guy he wanted 300.00 for the set, I told him it was too much for one bucket and a jump seat and he said "no Senior the other bucket is in the back of my truck". He went on to explain that he had taken them out of his 2010 Tahoe because he was putting racks or something in the back. Thats when I realized these were the second row seats not the front. This started to make more sense to me because most front row seats wont fold down completely flat and they normally have the shoulder belts built into the seats making them a pain to put in older vehicles.
I took 200.00 out of my pocket, dangled it in front of his face and he said OK.
Because they are second row seats they have quick release tracks on them. I think I should be able to make rails for them fairly easy. The price was definately right its just going to be a matter of the time involved in making the rails. The fact that they are basically brand new along with the addition of the jump seat will make the effort in getting them installed in the truck more than worth it.
Sunday, May 23, 2010
Vice
Over the last few months I have done multiple projects that would have been much easier if I had a bench vice to use. It seems like a stupid thing not to have but the one I had was bolted to the top of the Snap On side box that was stolen during our move.
Wanting another was a no brainer, where I was going to put it was a different issue.
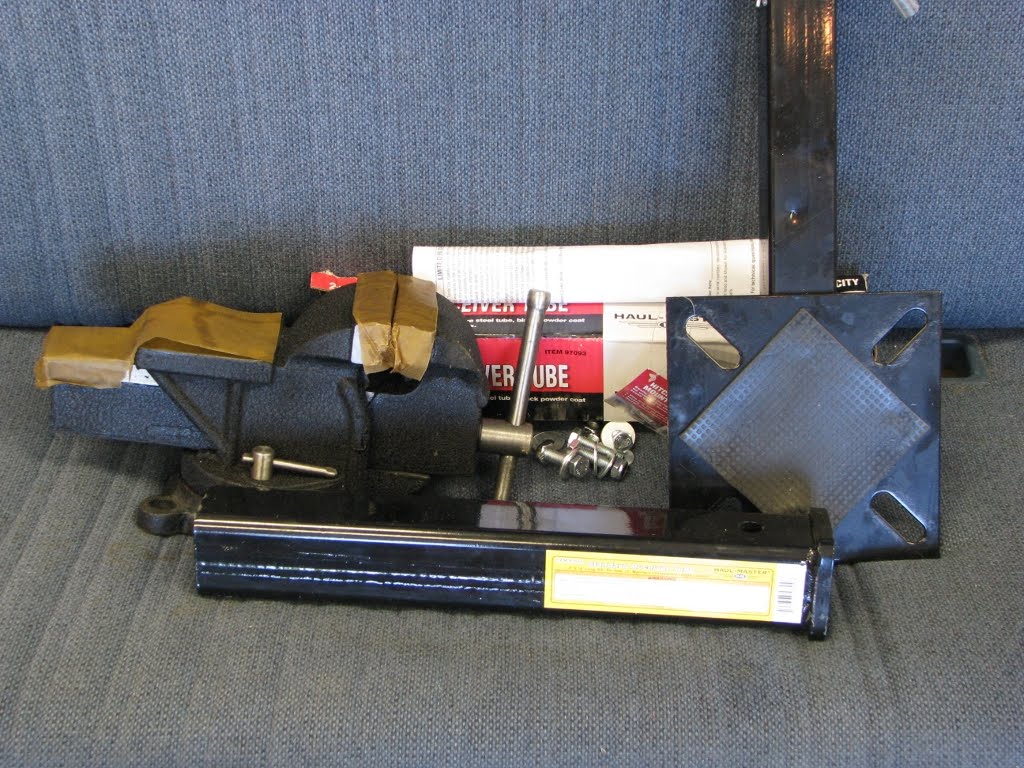
I had been considering an idea for mounting the vice and Saturday I went out to purchase the items I needed. Here they are pictured on my Hoosier couch (pickup seat in the garage).
My plan was to use a hitch mount vice and attach a reciever to the bottom of one of my Lions benches. The reciever I purchased is 18" long, this I can cut in half and place it in two different locations on the bench.
After I removed the ring at the inlet end and cut it in half I had to reinforce the corner of the bench. It obviously was not designed for this and the forces this would apply to the corner would have not allowed the vice to be very solid. I used some of the metal left over from the rivet shelf I mounted over the garage door to make a stiffener that went from the edge of the table to the upper portion of the leg mount which would support the aft end of the reciever.
With the reciever welded to the bottom edge of the table you can see how the vice is posistioned in relationship to the bench.
This design also allows the vice to be moved a ways out from the table which will be nice for holding long pieces of pipe or metal.
The main advantage of ths setup is the vice does not take up valuable space on the end of the bench. If it is in the way of items I want to place on the bench I can simply pull the pin and place the vice on the shelf under the bench. The hitch vice plate was cheap enough (18.00) that I may use this for a bench grinder as well.
Wanting another was a no brainer, where I was going to put it was a different issue.
I had been considering an idea for mounting the vice and Saturday I went out to purchase the items I needed. Here they are pictured on my Hoosier couch (pickup seat in the garage).
My plan was to use a hitch mount vice and attach a reciever to the bottom of one of my Lions benches. The reciever I purchased is 18" long, this I can cut in half and place it in two different locations on the bench.
After I removed the ring at the inlet end and cut it in half I had to reinforce the corner of the bench. It obviously was not designed for this and the forces this would apply to the corner would have not allowed the vice to be very solid. I used some of the metal left over from the rivet shelf I mounted over the garage door to make a stiffener that went from the edge of the table to the upper portion of the leg mount which would support the aft end of the reciever.
With the reciever welded to the bottom edge of the table you can see how the vice is posistioned in relationship to the bench.
This design also allows the vice to be moved a ways out from the table which will be nice for holding long pieces of pipe or metal.
The main advantage of ths setup is the vice does not take up valuable space on the end of the bench. If it is in the way of items I want to place on the bench I can simply pull the pin and place the vice on the shelf under the bench. The hitch vice plate was cheap enough (18.00) that I may use this for a bench grinder as well.
Monday, May 10, 2010
Ceiling Storage
A couple of months ago I found a Craigslist add for a clothing warehouse that was going out of business and had shelving for sale. I was not interested in any for myself as I was for shelving for work. The shelves they had listed were industrial type "rivet" shelves and being it was a clothing warehouse they would probably be in very good condition.
After making a call for directions we were talking with a liquidator on what was available. This was a 2 million square foot facility and they had thousands of shelves of all different sizes. We struck a deal and bought 30 six by eight foot shelves for $63.00 ea. They listed new for just over $500.00.
Shelves of this size are far too large for home type storage, but looking at them I came up with an idea to use one hanging from the ceiling in my garage.
I bought a four by six foot shelf from them for $50.00 and cut down the legs. I mounted it above my garage door and have enough material to make another. This one I am using to store the NOS fenders for my Nova instead of the roof of the car.
Mounted in this manner there is still enough room to put a garage door opener on the single door. I had to cut the legs shorter than I thought they would be due to the first panel of the door being kicked up as far as it is.
I am happy with how the project turned out and the cost involved. Units I was looking at that worked in the same manner were over $75.00 for a vinyl covered wire basket shelf.
I was also able to move the Nova and finish up the lighting in the single car stall, the lighting in the garage now is awesome. I have a few more things I want to finish up on in the garage (getting rid of junk), then I'll start looking more serious at either buying or building a rotisserie for the Nova.
After making a call for directions we were talking with a liquidator on what was available. This was a 2 million square foot facility and they had thousands of shelves of all different sizes. We struck a deal and bought 30 six by eight foot shelves for $63.00 ea. They listed new for just over $500.00.
Shelves of this size are far too large for home type storage, but looking at them I came up with an idea to use one hanging from the ceiling in my garage.
I bought a four by six foot shelf from them for $50.00 and cut down the legs. I mounted it above my garage door and have enough material to make another. This one I am using to store the NOS fenders for my Nova instead of the roof of the car.
Mounted in this manner there is still enough room to put a garage door opener on the single door. I had to cut the legs shorter than I thought they would be due to the first panel of the door being kicked up as far as it is.
I am happy with how the project turned out and the cost involved. Units I was looking at that worked in the same manner were over $75.00 for a vinyl covered wire basket shelf.
I was also able to move the Nova and finish up the lighting in the single car stall, the lighting in the garage now is awesome. I have a few more things I want to finish up on in the garage (getting rid of junk), then I'll start looking more serious at either buying or building a rotisserie for the Nova.
Monday, April 19, 2010
Storage 2
Saturday I spent most of the day on my stairwell access door. It was much more work than I had anticipated, mostly due to me wanting it to look good when it was complete and trying to do it as cheap as possible. Cutting the door at around 4.5 feet and remaking the jamb to compensate were just a couple things that added to the time.
Because I did go cheap I had to replace all the hardware on the door hinges with longer screws going into inserts, the original screws were loose and stripped.
The only items I have left to finish up are putting in the threshold, finishing up some of the insulation inside and painting it.
The area inside is smaller than I had envisioned but well worth the effort, it should make a good area to store odd shaped large items like the fenders off the Nova.
Because I did go cheap I had to replace all the hardware on the door hinges with longer screws going into inserts, the original screws were loose and stripped.
The only items I have left to finish up are putting in the threshold, finishing up some of the insulation inside and painting it.
The area inside is smaller than I had envisioned but well worth the effort, it should make a good area to store odd shaped large items like the fenders off the Nova.
Monday, April 12, 2010
Storage
There are things in life that just seem to be a rule, make more money, have less, get a better job, work harder, buy a bigger house, have less room.
For the last one I have an answer.
Our new home is much larger and much less cluttered but our storage areas are much less. Our last house had a walk up ceiling ladder in the garage leading into the attic. It was useful for a lot of my spare parts etc in the garage. If I really wanted to I could carry all the same items upstairs into the access hole in my sons room and try to move them up a ladder into a much more limited attic. For now though I decided to try something different.
The front wall of my garage is common to the pantry and staircase in the house. The pantry occupies the area under the staircase landing and is quite big, but until Tania mentioned it, I never really thought about the rest of the staircase. With ten foot ceilings and another three feet of dead space, the staircase is rather long. So last weekend while I was buying wood for my mini deck, I bought a door and a few other items to go through the wall in the garage and on into the stairwell.
After measuring twice and still cutting in the wrong spot I now have an opening started in the right area. Right now it's slow going because I had no idea how it was laid out inside. It looks like I will be able to put in about a five foot tall door. Its much higher than that inside but due to the way the staircase is built I can only take it up that tall.
For the last one I have an answer.
Our new home is much larger and much less cluttered but our storage areas are much less. Our last house had a walk up ceiling ladder in the garage leading into the attic. It was useful for a lot of my spare parts etc in the garage. If I really wanted to I could carry all the same items upstairs into the access hole in my sons room and try to move them up a ladder into a much more limited attic. For now though I decided to try something different.
The front wall of my garage is common to the pantry and staircase in the house. The pantry occupies the area under the staircase landing and is quite big, but until Tania mentioned it, I never really thought about the rest of the staircase. With ten foot ceilings and another three feet of dead space, the staircase is rather long. So last weekend while I was buying wood for my mini deck, I bought a door and a few other items to go through the wall in the garage and on into the stairwell.
After measuring twice and still cutting in the wrong spot I now have an opening started in the right area. Right now it's slow going because I had no idea how it was laid out inside. It looks like I will be able to put in about a five foot tall door. Its much higher than that inside but due to the way the staircase is built I can only take it up that tall.
The amount of money I spent on the door and supplies makes this some very cheap stoarge and most of the large items I had in the attic of my old house should fit in this area, I may even put in some shelving.
Monday, April 5, 2010
New Deck
Ok its not the kind of deck most people think of but it is a deck.
The side of the driveway drops off into a rainwater wash which didn't allow the the trash cans to sit flat, so I decided to build a smal 3'x5' deck to put them on. Now they dont tip over into the bushes and its much easier to put items in them. Matty had a good time cutting up the boards.
Subscribe to:
Posts (Atom)