Saturday, September 12, 2015

HPDE at Putnam Park Road Course (followup)

I had time today to tear into the Corvette and look at some of the issues I had last weekend.

First on the agenda was to clean up the car, it had rubber marks all over it along with rubber behind the wheel wells. I put the car up on jack stands and removed the wheels because I needed to look at the front end and brakes anyway and its easier to wash the wheel barrels when they are removed.

When I removed the tires, I noticed the buildup of rubber on them. This could have been the cause of the push, its also a lot of buildup still on them after driving the car all week putting almost 200 miles on it since the track.


There was also still a ton of brake dust inside the wheel barrels, I wash these weekly on or off the car.


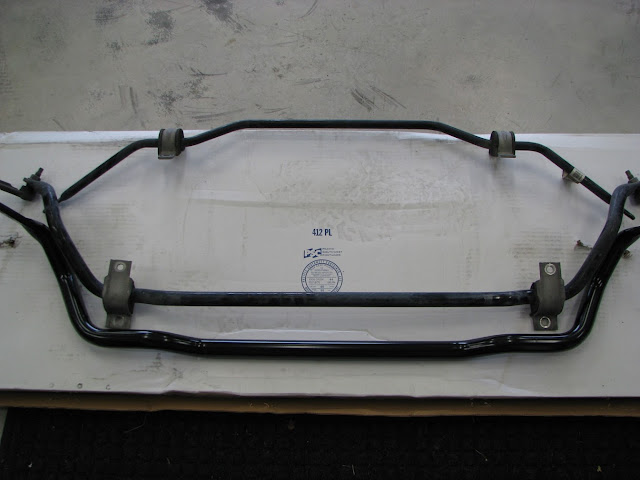
Looking a bit further I found the passenger side forward sway bar bushing had migrated out of the mount making the forward sway bar ineffective causing the push. The mount bolts were torqued properly and I cannot find any history on the net of this ever happening so the only conclusion I can make is I installed it incorrectly possibly not getting it set in the groves of the subframe and bracket.

You can see the bushing still on the bar in the lower center of the picture.


As for the spongy brakes I was able to figure a lot of that out before I left the track. Apparently bleeding my brakes a month before the track day was a bad thing to do, I should have bled them the day before. I wont go into a ton of details but basically brake fluid is very hygroscopic, the water it absorbs when heated turns to steam, steam compresses and you get spongy brakes.

The problem compounds itself because the brakes are weaker you use them longer and they get hotter.

Beyond even this is the brand of brake fluid, the better fluids cost more and the advantage of them is they raise the boiling point of the fluid some by more than 100 degrees.  Nearly everyone I spoke with was running Castrol SRF making it seemingly simple to just switch to using that. The problem is Casterol SRF is $60.00 for a 1 liter bottle, meaning it would cost $120.00 to flush and fill before a track event. Some of these guys are flushing their systems once a month and at a minimum before every track day they attend. I read some positive information on another fluid, Motul RBF 600 which has a slightly lower boiling point but costs only $15.00 a bottle, I will try it first.

Lessons Learned:
Track Days are fun!

Track Days are expensive!
  • $325.00 Registration Fee
  • $220.00 Insurance
  • $050.00 Fuel (approximate)
  • $350.00 wear on brake pads and rotors (approximate)
  • $500.00 wear on tires (approximate)
Right at $1500.00 considering incidentals 

Flush the brakes and use good fluid

Take off center caps

Driving position
The entire day I felt like I was fighting the car, I generally drive with the seat fairly close but I had the seat back reclined too much. With it in a more upright position it put my arms at a more favorable angle and would have made it much less tiring.

As much as Id lke to do it again I don't know if I will due to the cost, there is probably some things I could do to cut out some of it but registration fees, fuel, wear and tear are pretty fixed. I may try some autocross, its cheaper, easier on the vehicle and less chance of wrecks and damage. 

Monday, September 7, 2015

HPDE at Putnam Park Road Course

A few months ago I stopped by my neighbors house and he invited me to join him for an HPDE (High Performance Driving Experience) at Putnam Park Road Course. Its something I had thought about trying but didn't really know where to start.

He regularly attends with 10 / 10ths Motorsports driving a modified, street legal 2007 Z06 with approximately 550 rwhp. Running in the advance group he is a skilled driver and very quick.


10 / 10ths had a HPDE scheduled at Putnam Park Road Course Aug 2nd, I had never been there before so Tania and I drove out to look around. The track and facilities are basically a country club for gear heads. The grounds and the garages are immaculate, there is a concession stand with good cheap food and a small set of stands to watch from. It also has a nice administrative building with classrooms and a members only clubhouse. During their lunch break we were allowed to take tour laps on the track (60mph max speed), that sealed the deal for me.

Over the last few weeks I had been preparing for the day, modifications to the car, researching safety equipment and insurance options. Fireproof driving gloves being recommended I bought a set of Impact Racing gloves last week and Saturday was debating purchasing one day insurance. The difference between driving on public roads and at an HPDE is you are responsible for damage to your car (regardless of someone else causing it) and any damage you do to the track, facilities, guardrails etc.

Sunday morning my neighbor stopped by at 5am and we headed to the track just over 30 miles from our homes. Stopping a few miles from the track to fill our tanks, we arrived at the gates just before the 6am opening. I parked on the main pit lane, unloaded the car and set up my canopy, the next couple hours consisted of a drivers meeting, classroom training, and instructor assignments. I contacted an insurance company recommended by 10 / 10ths and secured one day of insurance.

We were running the basic 1.766 mile Long Course (marked in red).

My first 30 minute session consisted of learning corner entries, where to accelerate, where to brake and getting comfortable on the track. Towards the end of the session I was growing in confidence until I closed a bit too quickly on a ZL1 Camaro entering turn 7 and went off track to avoid hitting him. This required me to enter pit lane while the track Marshall looked at the car for damage and gave me a short pep talk about staying on the track. The session ended with a reality check on my driving abilities and the realization of how long it had been since I had done this type of driving.

The second session of the day was by far my best, I had regained my confidence, was hitting my marks on the track and making consistent laps. Early in the session though my brakes felt spongy, this condition would plague me the rest of the day. When I returned to my pit area, I parked the car, chocked the wheels, opened the hood and grabbed something to drink. While we were sitting there I heard some strange noises from the Corvette. Walking around the car I found both front wheel center caps laying on the ground. The brakes had gotten so hot the heat that transferred to the wheels had melted the tabs on the center caps and they fell out of the wheels.

Session 2 video Tania took from inside the flagman tower.


Shot from the base of the flag tower:

A friend of mine stopped by and took pictures with his iPhone 4, the heat apparently was getting to it as well creating some interesting pictures.


Cool down after session 2.

My third and final session started very well, then the brakes started becoming spongy and the front of the car developed a push. My instructor thought my tires were the culprit, a low fuel light ended the conversation and we left the track.

Because the day went so smoothly they had a fourth session scheduled. I was physically exhausted after 119 laps, 90+ degree temperatures and had a gallon of gas left, so I chose to call it a day.

I learned a lot yesterday, I have some unexpected things to look at on the car, the brakes, sudden push in the front end and it looks like I just drove it 2k miles cross country. I had a total blast and cant wait to do it again.

Sunday, August 30, 2015

Fire Extinguisher Mount

Thirty plus years ago I installed my first Holley carburetor. It was a used 850 double pumper going on my mild 331 small block chevy. The size of the carburetor vs the size of the motor tells you how little I knew about what I was doing, to further prove the point after getting it running and jumping in to drive it around the block, the float stuck causing raw fuel to dump out the vent tube on the intake starting a nice fire that took out the distributor, spark plug wires, firewall harness and windshield wiper motor. After spending over $300.00 to fix everything not including a new 650 Holley, I bought a fire extinguisher and mounted it in the car. That extinguisher got used a few years later when a car at the gas station I was filling up at caught on fire, and over the years Ive bought a few others for some of the cars I drove.

I decided since there was a simple way to mount one in the Corvette I would get one for it as well, its cheap insurance.

Again being a cheap ass I wasn't going to spend $90.00 for a flat piece of metal with a couple of bends in it, granted they are usually powder coated, maybe that's worth $75.00 or so.

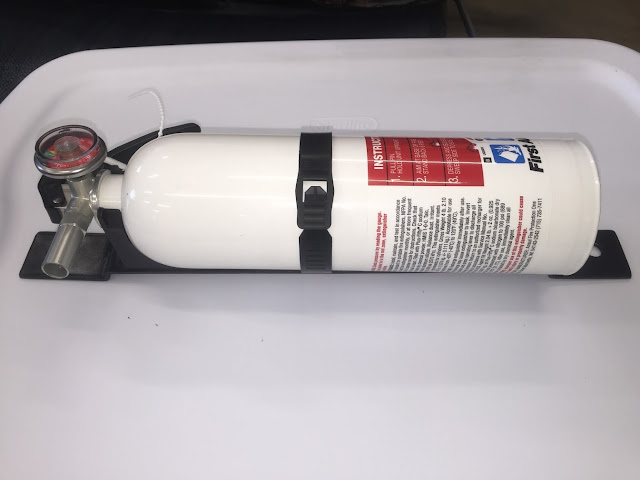
Its really as simple as a couple of bends, the bracket mounts to the forward seat mount studs, they are long enough to slip the bracket over them and add another nut.

Here is the extinguisher on the bracket I made, notice the plastic mount, there weren't any metal ones available locally, I have since replaced it with one.

Here is a shot of it installed on the passenger seat.
/

Saturday, August 29, 2015

Suspension Mods

Next on the list was the suspension. The Corvette handles great but the base coupe suspension compromises some performance for ride comfort. When we were at Bloomington Gold I specifically rode in the RideTech cars because I was interested in their coil over suspension. After researching more into what was available I settled on just replacing the sway bars and shocks.

I contacted Sam Strano (multi time SCCA Autocross National Champion), Sam is active on multiple forums and has a small parts business. Sam's business sells the coil over suspension I was looking at, after talking to Sam and describing what I wanted to do with the Corvette he sold me on his spec sway bars and Koni adjustable shocks. If they work for him on his Corvette and are less than 1/3rd the cost of the coil overs that works for me.

Sway bars from top to bottom: Old Rear Bar, Old Front Bar, New Front Bar.

Sway bars from top to bottom: Old Rear Bar, New Rear Bar, New Front Bar.

Koni Adjustable Sport Shocks

After I got everything installed I drove it for a few days and played with the dampening on the shocks. The difference is night and day over the factory equipment, the car is much more stable on small bumps during braking, it has significantly less body roll and the ride is only slightly harsher than it was before. The nice thing is, I can soften the dampening on the shocks in less than five minutes and it rides as nice as it did before I put them on.

Wednesday, August 19, 2015

Tow Hook

I plan to do a HPDE day this summer and decided to add a few things to the corvette. First on the list was a rear tow hook, corvettes do not have a good area to tow from in the event you run off track and end up in a sand trap or somewhere you cannot drive out of. Any strap or tow line to the suspension will most likely damage the bodywork because of how it wraps around the car and how low the car is to the ground. I also wasn't willing to pay $130.00 or more for something I felt I could make for a few dollars.

I looked up some of the installation instructions available online and pictures of tow hooks. From that I was able to ballpark the dimensions of the tow hook and fab one up. It only took a few hours with the hardest part being the hole in the bottom plate.


The tow lug simply mounts to the aft cross member using the exhaust hanger attach points.


Sunday, June 28, 2015

Bloomington Gold

This year Indianapolis was chosen to host Bloomington Gold. This show represents for me all the things I dislike about car shows, chrome, cars that are never driven, wax type discussions, etc. I am interested in the performance side and while I respect the whole 1 of 3, 100 point car that is Bloomington Gold, I would not have driven 50+ miles to go.

I was not even aware that it was being hosted here this year, the advertising apparently was done mainly through newspapers, I saw nothing on the local news or heard any radio ads. One of my reports at work, left a newspaper on my desk which spoke about 1000+ corvettes participating in a "Gold Tour", After reading the article, the proposed route and it being at the brickyard I had a reason to go.

The event was scheduled Thursday - Saturday June 25-27 with the Gold Tour ending the event Saturday night. We arrived mid morning Saturday and were only there a few hours when the vendors started packing up to leave. There were rides being given by Ron Fellows group driving brand new Z06's but by the time I figured it out it was too late to participate. We did get to ride in the Ridetech Z06's on the autocross course.


At the autocross course Lingenfelter had a second display with this awesome Karl Kustom Z06. While there were a lot of very impressive corvettes there, this was among my favorites.


Couple of Z06's in the parking lot with handicap tags, the blue one is a stage one aero and the yellow a stage 2.  I did not see a stage 3 this weekend.


We waited in line for about 45 minutes to sign up for the Gold Tour, for some reason they did not allow online signups. That evening it took a little over an hour to get everyone lined up and start the Gold Tour.


The tour route was planned for just over 41 miles in which they had every intersection we passed through blocked off.  The police were very active in pulling stray vehicles out of the line of corvettes and actually had major intersections blocked off for well over an hour as a line over five miles long consisting of 1,000+ corvettes went through.


Once the tour started we entered the track and did one lap (limited to 65mph). I really had no anticipation of driving around the brickyard but admittedly once you are doing it, it is very cool.


The last two shots were taken by a co-worker as we entered the Metropolis parking lot.


There are a few videos of the Gold Tour posted on the net, this is probably one of the better clarity / views out there. Tania and I are center frame at 10:40.

Saturday, June 20, 2015

Flower Bed Part 2

In August of 2013 we finished our flower bed / retaining wall project along the front of the house.  We had some block left over to start along the side of the house but did nothing with it last year.  This spring we decided to finish the project so I ran over to Lowes to get some more block. They had none in stock and no one there could tell me much about why or if they were going to get more etc.

I came back home and called Lowes tech support line and found out the company that supplied the block went out of business. They gave me a name of the manufacturer and suggested I try calling other stores to see if there was any stock remaining. I had no luck with that so we spent a weekend driving to different home improvement stores and landscape companies looking at block. I found out that there are quite a few different companies that make decorative concrete block. There is no standard for it, it changes from lot to lot and all of the landscape stores have "better" block than the home improvement stores, or at least that is what they claim.

In the end we did not find a suitable substitute and I was back on the phone making calls. Twenty three calls later and at least one French language phone switch board I found a guy at a landscape store in Davenport Iowa. He knew the company that made our stone which was about 20 miles away from him. He also thought he had a phone number for someone that had worked there. I told him I needed two pallets or four tons and he said he would make some calls. Two days later he called me back and said he had two pallets on the way and I was able to get them for the same price it would have cost me at Lowes. The bad part is Davenport is a 600 mile round trip and the only thing that I have access to that would handle that much weight is a 16 foot box truck.

After work Monday May 18th I picked up the truck and we drove to Le Claire and spent the night. The following morning it was a 15 mile drive to pick up the stone and another 300 home. We had all four tons unloaded and the truck back to the rental place before 5pm.

What four tons of block looks like


Over the next four weeks we put in a few feet a week and these are the final results.


Saturday, June 6, 2015

Laundry Room

Since we moved in we have had a resin folding table in the laundry room. Because we did some work with the sink as well as repaint I decided to get rid of the resin table. I was able to locate the company that made the cabinets in our home and order three lowers that matched.


Other than needing to add a duct I was covering to the kick panel they were easy to install, then came the odyssey that is Corian. You cannot buy it if your not certified you cannot install it if your not certified. The simple top was more expensive then the cabinets themselves and even though I ordered everything at the same time it took two more weeks to get the top installed.


Part of my plan was to add a Rev-a-shelf ironing board.  I was able to find a fairly good price on one at a store in Rapid City SD. It is fairly heavy though and the shipping was expensive, so Tania's parents picked it up and brought it with them when they came for Matty's graduation.


Saturday, March 28, 2015

Spot Free Rinse

I have been researching different options for a spot free rinse when washing my car.  On a moderately warm day it is next to impossible to get it dried without some spotting. This is mostly due to the quality of the water in this area.

Water quality is generally based on Total Dissolved Solids or TDS which is generally measured in Parts Per Million or PPM.  The EPA advises against consuming water with more than 500ppm TDS, the national average is 350ppm The area of Brownsburg I live in is on Indianapolis water, I measured the TDS at 398ppm well above the national average.

Initially I plumbed a soft water spigot into the garage because it was cheap and easy, it helped some with making the car easier to dry without spotting, but didn't come close to fixing the problem.

After much research I decided I was going to go with a Reverse Osmosis or RO system. Initially the wasted water (best case 3:1) was a deal breaker for me, but I came up with a plan to use the excess to water the flower beds around the house. Two things happened that would change my mind, I broke my thumb preventing me from doing all but the most simple tasks and Costco had a sale on the only other real option, a water De-ionizer.

This was a proven simple to use system that is designed exactly for what I wanted to do. Its initial cost is less than the RO system but it has a higher long term cost, unless I decide to process the resin myself.

The system works great, I could not be happier with it and only wish I had gotten one sooner. I can wash the car in 20 minutes, let it air dry in the garage and have next to no spots. Both cars can be done in less than an hour on the hottest days. It can also be used to rinse the windows on the house or any other items that would be time consuming or difficult to dry.


Sunday, March 8, 2015

Fall Like an Old Man

This February I was in Atlanta for work.  I normally don't like to travel much but when I can go to a much warmer location in winter its not so bad.  Unfortunately for me it never got above 20 degrees while I was there.

Leaving the hotel on the last day I was walking to my rental car and fell like an old man on some black ice.  My thumb hooked on the handle of my roller bag and promptly bent back to my wrist. I was quite sure it was broken, but had a flight in two hours back home.  Getting through security with two laptops, shoes and belt off was quite fun but I made it through eventually and had the pins put in three days later.

So now I get to wear a splint for six weeks before the pins can be removed.